Spring Boot Caching
Spring Boot Caching
Caching: The Spring Framework provides support for transparently adding caching to an application. At its core, the abstraction applies caching to methods, thus reducing the number of executions based on the information available in the cache.
EhCache: EhCache is an open-source, Java-based cache used to boost performance. The current version of Ehcache is 3. It provides the implementation of the JSR-107 cache manager. We can use it directly.
First, create a spring boot hello-world gradle project using reference:
https://beginnersword.blogspot.com/2020/07/getting-started-with-spring-boot.html
Implementation:
Add the below gradle dependencies in the build.gradle file.

Let’s create a TestCacheController in the controller package and create an endpoint named it as /testCaching.

Now create a model class Test and create a variable named username, message then generate getter and setter for them.

Let’s now create a service class with the name TestCacheService and create a method getTest, pass the username in the parameters and set the values for the variables.

Cache Configuration
We need to add Spring's @EnableCaching annotation to a Spring bean so that Spring's annotation-driven cache management is enabled. If we use this annotation we need not create the XML file for the cache manager.
Let's create a CacheConfig class:

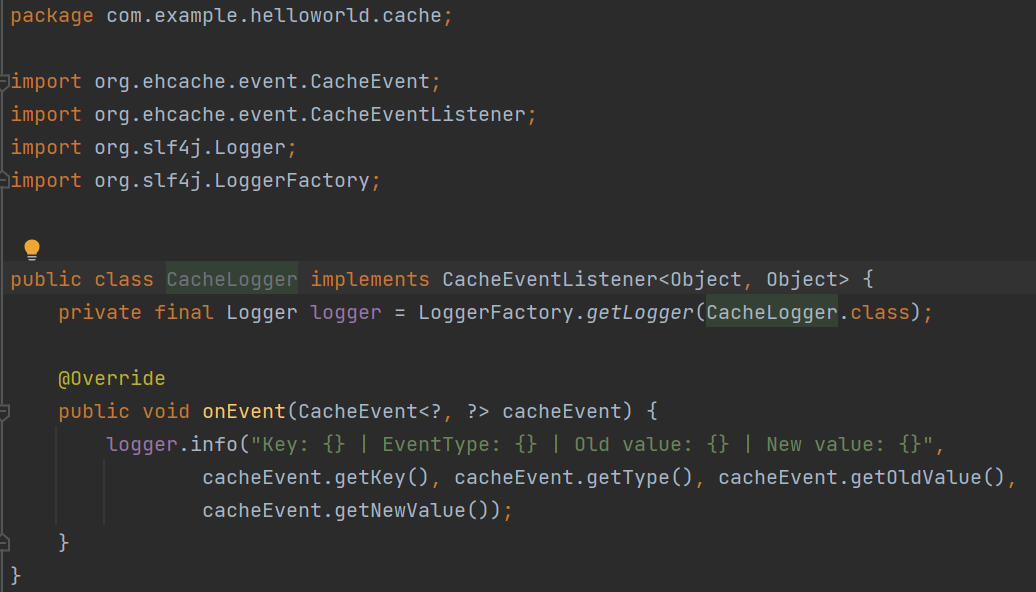
And let's also add the cache event listener which logs both CREATED and EXPIRED cache events:
Cache Manager: A CacheManager is the primary mechanism for retrieving a Cache instance, and is often used as a starting point to using the Cache.
CacheManager cacheManager = CacheManager.getInstance();
In order to use this cache manager we need to set the cache configuration.
For this we need to create a method testCache in the CacheService class to set the configuration.

setName - Used to set the name of the cache.
setTimeToIdleSeconds - It is the maximum number of seconds an element can exist in the cache without being accessed.
setTimeToLiveSeconds - It is the maximum number of seconds an element can exist in the cache regardless of use. The element expires at this limit and will no longer be returned from the cache.
setMaxEntriesLocalHeap - This is the maximum number of cache entries or bytes a cache can use in local heap memory.
So, here the name of the cache is “testCache”, the timeToIdleSeconds is 5 sec, timeToLiveSeconds is 5 sec and the maxEntriesLocalHeap is 1500 bytes.
And adding the test object to Cache if the passed object is not null.
This caching is performed on a method getTestCache in this application.
Here before calling the method to get the response, a call to the cache manager is made to check if there is any existing caching with a key.
Here, the key is the username.
Now, we need to create a method addTestCache in cacheService class and set the key to cache, key is the username.
Setting key to cache:

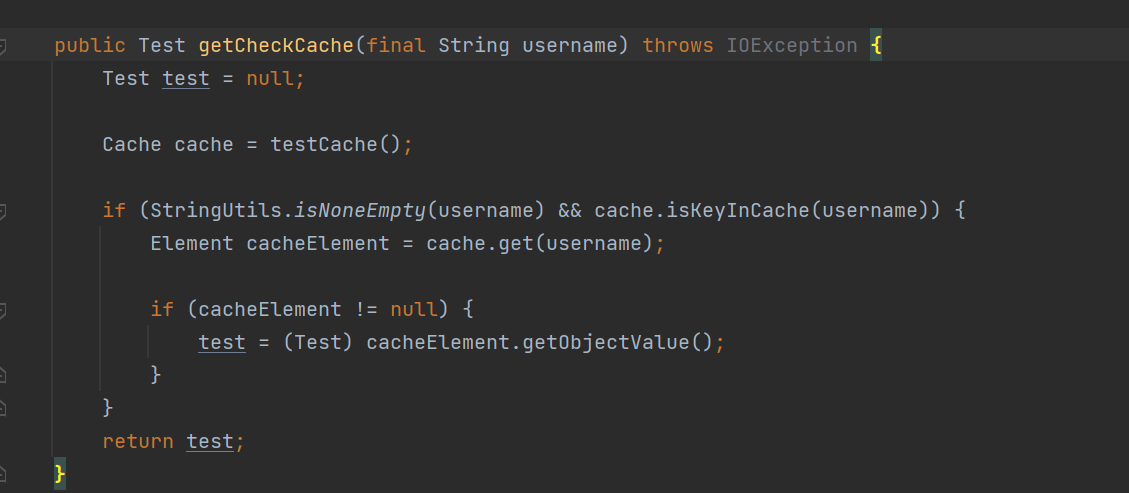
Now, create a method getCheckCache in cacheService class to check if caching exists for a key.
Here is the method to check if caching exists for a key :
Now, create a method getTestCache in TestCacheService class to call the caching method and to implement it.
Here is the complete method in which the caching is called and implemented:

Checking if anything is cached for a key:
testResult = cacheService.getCheckCache(userName);
If testResult returns a null value, a call is made to get the results from the getTest method.
testResult = getTest(userName);
If anything is not cached for a key, then a call is made to addTestCache method in the cacheService and returns the test results.
cacheService.addTestCache(testResult);
Now, let's create a method getCache in the TestController for the /testCaching endpoint and add the requestParam as username.

Here, a call is made to the getTestCache method in the testCacheService class to get the cache response and stored in the test object, then returns the test object.
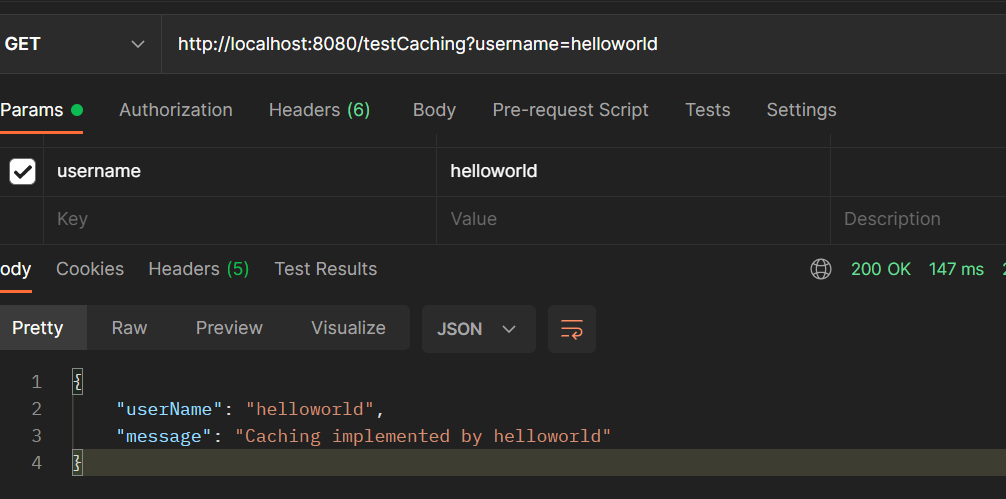
Now, hit this url http://localhost:8080/testCaching in the postman and pass the username in the query params.
Here is the response after hitting the endpoint for the first time.
Here is the response after hitting the endpoint for the second time.

Here we can observe the time difference hitting the endpoint for the first time and second time.
At the first time we got the normal response.
The second time when we hit the endpoint with the same username then we got the cached response in less time.
- Ruchitha Pabboju


Comments
Post a Comment